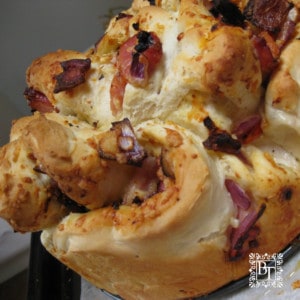
Savoury Pull Apart bread - Thermomix
5 stars tells us you love the recipe
becs-table.com.auLearn how to bake irresistible pull-apart yeasted bread at home with a Thermomix. With its tender texture and endless filling options (savoury or sweet), it’s a delicious, family friendly treat for any occasion.
Equipment
- 1 Thermomix
Ingredients
- 300 g water
- 10 g dry yeast
- 520 g white bakers flour
- 1 tsp salt
- 1 tsp sugar
- 20 g olive oil
For the filling
- 20 g Olive oil
- 2 rashers streaky bacon chopped
- 1/2 red onion sliced
- 1 Cup mixed cheeses what ever you like but mozzarella and tasty work well together.
Instructions
- In your Thermomix weight in 300g of water set for 37°c/ 3 mins/speed 1. Then add the dry yeast on top of the water, missing the blades and leave it for 5 minutes to soften and start activating.
- Weigh in your 520g of flour covering all the yeast then add your salt, sugar and oil. Mix for 5 seconds/ speed 4.
- Now set to knead for two mins. Keep an eye on your machine, they like to walk.
- Leave the dough in the Thermomix to prove (as long as I don't need the bowl for anything else of course). It should double in size popping out of the top of your Thermomix about an inch if you leave it in. Another way is to pop it in your Thermo Server if you have one. Your Thermo Server is an ideal proving chamber for this amount of dough. It's best if you warm it up first. Boil the jug and pour in the hot water, leave it for 5, minutes then tip it out and dry the bowl as quickly as you can. Use a little oil to coat the inside of the server bowl then place in the dough and pop on the lid. Leave it to prove, once the lid pops open about 2 cm, it's proven enough.
- Once your dough has proved, knead again for 5 seconds to release it from the sides of the bowl then tip out the dough. Roll into a ball cover with a cloth then gather the remainder of your ingredients.
- Weigh the cheeses into the TM bowl and grate for 5 seconds/speed 6 then set aside.
- Add the onion to your TM bowl and chop on speed 5/3 seconds. Add the chopped bacon and oil and set to 5 min/100°c/reverse sp + 2. Once the time is up, leave to cool.
- Prepare a tin or tray. If you have a springform tin use that otherwise just butter and dust a standard cake tin, or you can even just stack them all together on a large tray, for a free-form shape if you wish.
- Roll your dough out into a rectangle (around a 1cm thick) onto a clean lightly dusted surface. Don't use too much flour, in fact; I find most of the time I don't have to add any extra flour to my bench at all because it's a perfect consistency. Although all flour is different and if you find yours is a little sticky you'll need to do a little dusting. (of flour that is)
- Once you've rolled out your dough, you'll need to layer your fillings over the top. Using a knife or pizza wheel cut long strips of equal length and width. Take one end of a strip and gather it folding back and forth as you go. Then sit it upright it in or on your prepared tin. Continue this process till you have all the dough in, remembering to leave a few gaps for the dough to rise.
- Now it's ready to go into the oven. You can either let it prove a further 1/2 an hour to an hour or set your oven to 200°c and pop it straight in. This second rising can be done slowly as the oven reaches full temperature. Keep an eye on your creation, and when the top is a deep golden brown, it's ready to pull out and pull-a-part. Oh, leave it cool a bit first.